Jul 30, 2009

DNS Stub Zones in Windows Server 2003

DNS Stub Zones in Windows Server 2003

We would like to extend a warm welcome to Microsoft expert Mitch Tulloch as he presents his first article to the WindowsNetworking.com community. In this article we'll learn about stub zones, a new feature of DNS in Windows Server 2003. Stub zones can help reduce the amount of DNS traffic on your network by streamlining name resolution and zone replication. We'll examine how stub zones work, when you would use them, and how to set them up in this tutorial.

Stub zones are a new feature of DNS in Windows Server 2003 that can be used to streamline name resolution, especially in a split namespace scenario. They also help reduce the amount of DNS traffic on your network, making DNS more efficient especially over slow WAN links. This article will look in detail at what stub zones are, how they work, and when to use them. I'll also walk you through the process of creating a stub zone to facilitate name lookups between two separate forests. But first, a little background on DNS zones is necessary to see where stub zones fit into the overall picture.

Types of DNS Zones

A zone is a contiguous portion of DNS namespace managed by one or more name servers. Zones contain resource records that specify the name of the DNS server authoritative for the zone (SOA record), the names and IP addresses of all name servers in the zone (NS records), the names and IP addresses of other hosts (A records), aliases for hosts (CNAME records), and so on.

In the original implementation of DNS found in RFCs 1034 and 1035, two different types of zones were defined:

  • Primary zones, which store their zone information in a writable text file on the name server.
  • Secondary zones, which store their zone information in a read-only text file on the name server.

In the implementation of DNS on Windows NT, these two types of zones were referred to as standard zones. A typical scenario for a company that had a single Windows NT domain deployed would involve setting up two name servers on the network, one containing the standard primary zone (the primary name server for the domain) and the other containing the standard secondary zone (the secondary name server). Whenever a new host (for example, a file server) was added to the network, both these name servers had to be updated so clients could find the new host using DNS. To do this, the administrator would create a new A record on the primary name server since the only the primary zone could be modified. The primary name server would then notify the secondary that its records had changed, and the secondary would pull the updated zone information from the primary until it had an identical copy of the primary zone. From the perspective of the secondary name server, the primary name server represents the master name server for this zone.

The main problem with this arrangement was that if the primary name server went down, no changes could be made to the resource records since secondary name servers contained read-only zone information. Also, it meant that all the changes you made to DNS had to be performed on a single name server (the primary), which could be an inconvenience if the company spanned several locations.

Windows 2000 provided a solution to these issues by introducing Active Directory Integrated zones, which stored their zone information within Active Directory instead of text files. The advantages of this new type of zone included using Active Directory replication for zone transfers and allowing resource records to be added or modified on any domain controller running DNS. In other words, all Active Directory Integrated zones are always primary zones as they contain writable copies of the zone database.

Active Directory Integrated zones work well for most Windows 2000-based networks, but they do have some issues. One limitation is if you are dealing with two separate forests (disjointed namespace), a common scenario when companies are merging or form part of a conglomerate. For example, say Company A has close business ties with Company B and employees in Company A need access to resources on Company B's internal network. The usual way of providing them this access would be for the DNS administrator of Company A to add a standard secondary zone on each of Company A's name servers. These secondary zones would then point to name servers on Company B's network as their master name servers, and would obtain their resource records by zone transfers with Company B's name servers. While that works, it's overkill for several reasons. First, it generates a lot of zone transfer traffic between name servers in Company A and Company B, which can pose a problem if the companies are linked together by a slow WAN connection. Second, if Company B decides to decommission one of its name servers without telling the administrator of Company A, some of the secondary zones on Company A's name servers could suddenly find themselves without a master, and once their records expire the Company A clients that use them will no longer be able to access resources in Company B.

What Stub Zones Do

Enter stub zones to the rescue. A stub zone is like a secondary zone in that it obtains its resource records from other name servers (one or more master name servers). A stub zone is also read-only like a secondary zone, so administrators can't manually add, remove, or modify resource records on it. But the differences end here, as stub zones are quite different from secondary zones in a couple of significant ways.

First, while secondary zones contain copies of all the resource records in the corresponding zone on the master name server, stub zones contain only three kinds of resource records:

  • A copy of the SOA record for the zone.
  • Copies of NS records for all name servers authoritative for the zone.
  • Copies of A records for all name servers authoritative for the zone.

That's it--no CNAME records, MX records, SRV records, or A records for other hosts in the zone. So while a secondary zone can be quite large for a big company's network, a stub zone is always very small, just a few records. This means replicating zone information from master to stub zone adds almost nil DNS traffic to your network as the records for name servers rarely change unless you decommission an old name server or deploy a new one. And to make replication even more efficient, stub zones don't use UDP as traditional DNS zone transfers do. Instead, stub zones use TCP, which supports much larger packet sizes than UDP. So while a typical zone transfer might involve many UDP packets flooding the network, stub zone transfer only involves a few packets at most. Also, while most DNS servers can be configured to prevent zone transfers to secondary zones from occurring, stub zones request only SOA, NS, and A records for name servers, all of which are provided without restriction by any name server since these records are essential for name resolution to function properly. Finally, since stub zones can be integrated within Active Directory (secondary zones can't), they can make use of Active Directory replication to propagate their information to all domain controllers on your network.

In our previous scenario, stub zones can be used instead of secondary zones to reduce the amount of zone transfer traffic over the WAN link connecting the two companies. To do this, the administrator for Company A would simply log on to one of the domain controllers, open the DNS console, and create a new stub zone that uses one or more of Company B's name servers as master name servers. By making this stub zone an Active Directory Integrated zone, the stub zone will then be automatically replicated to all other domain controllers on Company A's network. Now when a client on Company A's network wants to connect to a resource on Company B's network, the client issues a DNS query to the nearest Company A domain controller, which then forwards the query to one of Company B's name servers to resolve.

How to Create a Stub Zone

Let's see how it works in practice. In my lab I have two forests set up, one for Company A running Windows 2003 Server and named test2003.local, and the other for Company B running Windows 2000 and named test2000.local. The domain controller for the root domain of Company A is named SRV220 while the domain controllers for the root domain of Company B are named SRV210, SRV211 and SRV212. Sally is an employee of Company A and her desktop computer is named DESK231, and she needs to access a share named CATALOG located on SRV210 in Company B. To do this she clicks Start, selects Run, and types \\srv210.test2000.local\catalog and the result is an error:

This is because her command issues a DNS query against her name server SRV220 which has no information in its DNS database about test2000.local, the root domain of Company B:

To allow users in Company A to access resources in Company B, the administrator of Company A decides to create a stub zone for Company B's domain. To do this, right-click on Forward Lookup Zones in the figure above and select New Zone. This starts the New Zone Wizard:

Clicking Next brings up the Zone Type screen, and we'll choose Stub Zone here and select the checkbox to create an Active Directory Integrated stub zone:

Click Next and the Active Directory Zone Replication Scope screen is displayed, which we'll leave at its default setting for automatic replication of stub zone information to all domain controllers in the test2003.local domain.

Clicking Next displays the Zone Name screen, and here we type test2000.local as the name of the stub zone since this is the name of the target domain on Company B's network:

Clicking Next displays the Master DNS Servers screen, and we enter the IP address 172.16.11.210 for one of the name servers on Company B's network:

Clicking Next and then Finish runs the wizard and creates the new stub zone, which here is highlighted in the DNS console connected to SRV220 on Company A's network:

Note in the above figure that as expected the stub zone contains only an SOA record, an NS record for each name server in the domain, and an A record for each name server in the domain. Now when Sally clicks Start, selects Run, and types \\srv210.test2000.local\catalog a window opens up displaying the contents of the CATALOG share on SRV210 in the remote forest:


Summary

Stub zones are easy to create and can make name resolution between forests more efficient, but they have other uses as well. For example, stub zones can enable name servers to perform recursion without needing to query the Internet root name servers or internal corporate root servers, thus decreasing the number of hops between name servers and making name resolution more efficient. Another use of stub zones is to keep delegated zone information up to date and prevent lame delegations from wrecking name resolution within a forest, and that would make a good topic for a future article. Both of these are good topics for future articles, so stay tuned for more on stub zones later.

Source: Windowsnetworking

DNS Conditional Forwarding in Windows Server 2003

In this article we'll look at conditional forwarding, a new feature of DNS in Windows Server 2003. Conditional forwarding can be used to speed up the DNS name resolution process by directing queries for specific domains to specific name servers. This tutorial explains in detail when conditional forwarding can be useful and how to set it up.

Conditional forwarding is a new feature of DNS in Windows Server 2003 that can be used to speed up name resolution in certain scenarios. They can also be used to help companies resolve each other's namespace in a situation where companies collaborate a merger is underway. This article will look in detail at how conditional forwarding works, how to configure it, and when you might use it. But first, let's briefly review the concepts of forwarding and forwarders in traditional DNS, starting with different types of name queries.

Forwarders and Forwarding

When a name server is queried in DNS, the way it responds depends on the type of query issued, which can be either iterative or recursive. In an iterative query, the client asks the name server for the best possible answer to its query. The name server checks its cache and the zones for which it is authoritative and returns the best possible answer to the client, which could be either a full answer like "here is the IP address of the host you are looking for" or a partial answer like "try this other name server instead, it might know the answer." In a recursive query, things work a little different for here the client demands either a full answer (the IP address of the target host) or an error message like "sorry, name not found." In Windows DNS, client machines always send recursive queries to name servers, and name servers usually send iterative queries to other name servers.

Sometimes this process isn't enough however. A simple example is a company that has Active Directory deployed on its internal network and uses a private top-level domain like .local for its forest. For example, say a company has a single Active Directory domain named test2003.local, a domain controller (and DNS server) named SRV220 and has a dedicated connection to the Internet. A user named Bob goes to his desktop computer named DESK231, opens Internet Explorer, and tries to access Google (www.google.com). Here's what happens DNS-wise as far as name resolution is concerned:

  1. DESK231 sends a recursive query to SRV220 asking to resolve www.google.com into its associated IP address.
  2. SRV220 looks in its DNS database and finds zone information only for the test2003.local domain, realizes www.google.com is not part of that domain, decides it has no way of knowing how to resolve www.google.com into an IP address, and what happens next depends:
    1. If, when you promoted your standalone server to the role of domain controller using dcpromo, your machine was disconnected from the Internet and there were no other DNS servers on your network, then dcpromo creates a root zone (".") in its DNS database that specifies itself as the root name server for all DNS name resolution (that is, "the buck stops here"). In this case, SRV220 realizes it can't answer the query and returns a "name not found" error to the client and Bob can't open the Google home page.
    2. If however, when you promoted your server to a domain controller, your machine was connected to the Internet, then Windows contacts the first available Internet root name server and downloads a list of all Internet root name servers, which becomes its list of root hints. In that case name resolution now continues as follows:
  3. SRV220 sends an iterative query to the first available Internet root name server, which responds with the IP address of a name server authoritative for the .com top-level domain.
  4. SRV220 sends a second iterative query to the name server authoritative for .com, and this machine responds with the IP address of a name server authoritative for the google.com domain.
  5. SRV220 sends a third iterative query to the name server authoritative for google.com, and this machine responds with the IP address of the host named www.google.com.
  6. SRV220 returns the IP address of www.google.com to DESK231 and Bob sees the Google home page appear in his browser.

Now that's a lot of steps, and if the company has a slow WAN link to the Internet then you're using valuable bandwidth. A better approach than "going up to root" to resolve www.google.com would be to configure a forwarder. A forwarder is a name server that handles name queries that can't be resolved by another name server. Let's see how the above scenario works when a forwarder is configured on the internal name server SRV210:

  1. DESK231 sends a recusrive query to SRV220 asking to resolve www.google.com into its associated IP address.
  2. SRV220 looks in its DNS database and finds zone information only for the test2003.local domain, realizes www.google.com is not part of that domain, decides it has no way of knowing how to resolve www.google.com into an IP address, and checks its list of forwarders to see if any forwarders have been configured for it.
  3. On the forwarders list it finds the IP address of the external name server hosted by the company's Internet Service Provider, so it forwards the query to the ISP's name server to handle.
  4. The ISP's name server goes up to root as needed (which can involve two or more additional queries) to resolve www.google.com into its IP address and returns this address to SRV220.
  5. SRV220 returns the address to Bob and he sees Google appear in his browser.

Note that this procedure takes about the same number of steps as before, but most of these steps are performed offsite by the ISP's name server, so the amount of bandwidth used over the Internet connection is considerably less and the processing load on the internal name server SRV220 is minimized as well. And these are good things from an administrator's perspective. Of course, if the forwarder doesn't respond within the timeout configured, the server can either try another forwarder (if configured) or use root hints (if available) or give up and return an error.

On Windows 2000, forwarders are configured using the General tab of the DNS server's properties sheet in the DNS console:

What's different in Windows Server 2003 is the concept of conditional forwarding, which I'll look at next.

What Conditional Forwarding Does

A conditional forwarder is one that handles name resolution only for a specific domain. For example, you could configure your name server to forward any requests for hosts in the domain google.com directly to a specific name server that is authoritative for the google.com domain. What this does is speed up the name resolution process by eliminating the need to go up to root to find this authoritative server. In this case our previous example would now look like this:

  1. DESK231 sends a recusrive query to SRV220 asking to resolve www.google.com into its associated IP address.
  2. SRV220 looks in its DNS database and finds zone information only for the test2003.local domain, realizes www.google.com is not part of that domain, decides it has no way of knowing how to resolve www.google.com into an IP address, and checks its list of forwarders to see if any forwarders have been configured for it.
  3. On the forwarders list it finds a conditional forwarder configured, which specifies the IP address of an authoritative name server for the google.com domain, so it forwards the query to this name server to handle it.
  4. The google.com name server immediately resolves www.google.com into its IP address without the need of going up to root and returns this address to SRV220.
  5. SRV220 returns the address to Bob and Google quickly shows up in his browser, prompting Bob to say, "Hey, the network sure is fast today!"

Let's now see how to configure this in Windows Server 2003 DNS.

How to Configure Conditional Forwarding

First let's find a name server authoritative for the google.com domain. To do this we'll use the WHOIS lookup tool on the NetworkSolutions website at http://www.networksolutions.com/en_US/whois/index.jhtml. Go to this page, type google.com into the WHOIS search box, enter the code displayed (a feature that prevents mass lookups by automated programs), and the following results are displayed:

google.com

Whois Server Version 1.

Domain names in the .com and .net domains can now be registered
with many different competing registrars. Go to http://www.internic.net
for detailed information.

Domain Name: GOOGLE.COM
Registrar: ALLDOMAINS.COM INC.
Whois Server: whois.alldomains.com
Referral URL: http://www.alldomains.com
Name Server: NS2.GOOGLE.COM
Name Server: NS1.GOOGLE.COM
Name Server: NS3.GOOGLE.COM
Name Server: NS4.GOOGLE.COM
Status: REGISTRAR-LOCK
Updated Date: 03-oct-2002
Creation Date: 15-sep-1997
Expiration Date: 14-sep-2011

Let's find out the IP address of name server NS1.GOOGLE.COM using ping:

Now that we have the IP address of one of the name servers authoritative for the google.com domain, we can configure Windows Server 2003 DNS to conditionally forward all name queries for this domain to this name server.

To configure conditional forwarding, open the DNS console under Administrative Tools, right-click on the DNS server node, select properties to open the Properties sheet for the DNS server, and select the Forwarding tab:

If you compare this to the previous figure for Windows 2000 DNS above, you'll see a few differences. First, if you just want to configure a regular forwarder here, leave "All other DNS domains" selected in the DNS domain listbox, enter the IP address of the forwarder (typically the address of your ISP's name server) in the dotted box, and click Add. If you want to add a conditional forwarder however, do the following. First, click the New button and type the name of the domain you want your name server to conditionally forward to:

Click OK and the new domain appears in the top listbox (make sure it is selected for the next step):

Now type the IP address of your conditional forwarder into the dotted box and click Add to add it to the selected domain's forwarders list:

Click OK to apply the change and close the properties sheet and you're done. Now any name queries for the google.com domain that are issued against the name server are forwarded directly to the name server for the google.com domain to resolve.

Using Conditional Forwarding

When might you want to use conditional forwarding in the real world? I can think of several situations where it might be useful:

  • To improve name resolution between two separate companies that need to provide their users with access to resources in the other company's intranet. This sort of situation is common in a merger situation or between supply-chain partners. Just set up DNS servers in each company to forward name requests for resources in the other company's network directly to the IP addresses of name servers in the other company and you're done. Of course, this can also be done using stub zones as I discussed in my previous article DNS Stub Zones in Windows Server 2003 and I'll compare the two approaches in a moment.
  • To improve name resolution within an Active Directory implementation that has a disjointed namespace (separate forests or multiple domain trees) or a deep hierarchy of subdomains. In this kind of situation you can set up conditional forwarding so users in one domain can avoid having to go all the way to root to find resources in a separate forest, another domain tree, or way down the domain hierarchy in a tree. Again, stub zones could also be used for this purpose if desired.
  • And then there's using it simply to forward name queries for specific Internet sites like google.com as in the example above, but that example was meant only to be illustrative of the procedure for configuring conditional forwarding on your name server--my company has no plans on merging with Google anytime soon.
Summary

Finally, is there anything you need to watch out for regarding using conditional forwarding? Two things come to mind First, conditional forwarding is suitable if you are dealing with a fixed DNS infrastructure. That means in a merger or supply-chain scenario you must be sure the other company doesn't plan on changing their DNS infrastructure by decommissioning old name servers, deploying new ones, or changing the IP addresses of existing ones. If they do change their infrastructure and don't inform you of this, then your name server may suddenly find itself forwarding queries to non-existing name servers resulting in failed name queries and frustrated users flooding help desk with calls. In that case, it might be better to create stub zones on your name servers for zones for which the other company's name servers are authoritative. That's because stub zones automatically update themselves with the current list of name servers in the zone while configuring forwarders is a process that has to be done manually. Same thing in a large enterprise that has a complex Active Directory forest--if you aren't sure that administrators in other divisions of your company are going to tell you in advance when they change their DNS infrastructures, don't implement conditional forwarding--use stub zones instead.

The second caveat concerning conditional forwarding is not to get to carried away implementing it. You might think you could improve name resolution for your users by adding dozens of forwarders for the most popular Internet sites they use for work purposes, but this might be a bad idea. The reason is, when you have a long list of conditional forwarders configured, your name server has to go through the entire list until it either finds the domain requested or fails to find it, in which case standard forwarding is used (if configured), after which root hints is tried and standard recursion employed. The result of this is that your name server has to perform extra processing to go through the forwarders list each time a query is received, and in addition to increasing the CPU load on your server this can also result in slower name resolution rather than faster due to the time it takes to process an especially long list. And if the forwarder itself is also part of your own company's DNS infrastructure then be aware that the added load of receiving forwarded queries from other name servers and performing recursive queries to resolve them means your forwarders will experience especially heavy CPU utilization and may need to have their hardware beefed up considerably to handle it. So if you do plan on using conditional forwarding, particularly within your own enterprise, be sure to use it only where it really makes a difference and use it sparingly.

Source: Windowsnetworking

Active Windows 7 for FREE

Chương trình Active Windows 7 RTM, làm việc 100%
Download: http://ifile.it/6xop0br

Jul 29, 2009

Nâng cấp trực tiếp Windows 7 Beta hay RC lên Windows 7 RTM

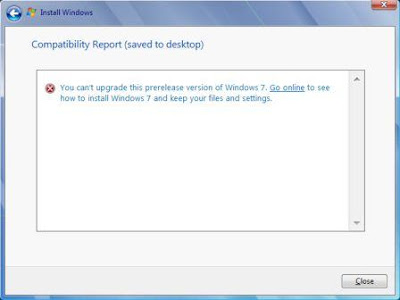
Người dùng Windows 7 Beta or RC khi cố gắng nâng cấp lên Windows 7 RTM sẽ gặp phải thông báo lỗi về vấn đề tương thích sau:

You cannot upgrade this prerelease version of Windows 7. Go online to see how to install Windows 7 and keep your files and settings.

Microsoft chỉ cho phép người dùng có thể nâng cấp từ phiên bản Windows 7 build 7233. Như vậy những người đang sử dụng Windows 7 Beta build 7000 và Windows 7 RC build 7100 sẽ không có khả năng nâng cấp lên Windows 7 RTM. Windows Server 2008 R2 cho phép nâng cấp từ phiên bản RC lên Windows Server 2008 RTM.
Tuy nhiên vẫn có cách để hack Windows 7 RTM cho phép bạn nâng cấp từ Windows 7 Beta or RC lên Windows 7 RTM
  1. Copy or download the Windows 7 RTM ISO vào máy tính mà bạn muốn nâng cấp.
  2. Mount file ISO vào ổ CD ảo, copy tất cả ra ổ cứng, USB, hoặc ổ cứng gắn ngoài.

    Bạn cũng có thể dùng Winrar để .

  3. Mở thư mục sources.
  4. Mở file cversion.ini bằng Notepad.
  5. Sửa MinClient thành bản build thấp hơn. Ví dụ thay đổi từ 7233 xuống 7000.

    Ban đầu:
    [HostBuild]
    MinClient=7233.0
    MinServer=7100.0

    Thay đổi:
    [HostBuild]
    MinClient=7000.0
    MinServer=7100.0

  6. Lưu lại.
  7. Double Click lên file setup.exe và bắt đầu quá trình nâng cấp.

Configuring the Lightweight Directory Services, Part 2

In my first article in this series on creating lightweight directory services, I explained that the Lightweight Directory Service (AD LDS) had replaced Active Directory Application Mode in Windows Server 2008. I talk about some real world examples of how AD LDS is used. In this article, I want to finish off the series by showing you how to install AD LDS, and by talking about some of the differences between AD LDS and ADAM.

Installing the Lightweight Directory Service

The process of installing AD LDS is pretty simple. Begin by opening the Server Manager console. When the console opens, click the Roles container to go to the Roles Summary section. Now, click the Add Roles link. Windows will now launch the Add Roles Wizard. Click Next to bypass the wizard’s Welcome screen, and you will see a screen that allows you to select the roles that you want to install. Choose the Active Directory Lightweight Directory Services option, as shown in Figure A.

Figure A Select the Active Directory Lightweight Directory Services option.

Click Next, and you will see a screen introducing you to the AD LDS. Go ahead and click Next again, and you will see a message telling you that the server will need to be restarted once the installation process completes. Now, click the Install button, and Windows will begin copying the necessary files. When the file copy process completes, click Close.

Configuring AD LDS

Now that you have installed AD LDS, it is time to configure it. To do so, close the Server Manager, and then select the Active Directory Lightweight Directory Services Setup Wizard command from the Administrative Tools menu. When the wizard starts, click Next to bypass the wizard’s Welcome screen.

You will now see a screen asking you if you want to install a unique instance of AD LDS or if you want to create a replica of an existing instance. Choose the option to create a new instance, and click Next.

You should now be prompted to enter a name for the new instance that you are creating. After doing so, click Next. Windows will now confirm that you want to use port 50000 for LDAP communications and port 50001 for SSL communications with the application partition that you are creating. Unless you have a compelling reason to change these port numbers, click Next to accept the defaults.

The next screen that you will encounter asks you if you want to create an application directory partition. The way that you will have to answer this question depends on whether or not the application that will be using the partition creates its own directory partition or not. For the sake of this article, go ahead and click No, followed by Next.

You will now be asked to enter the path where you want the data files and the recovery files stored. I recommend using separate volumes for the data files and for the data recovery files. Click Next to continue.

The next screen that you will encounter asks you to provide a service account. You can either use a network service account or you can designate a domain service account. Click Next, and you will be allowed the opportunity to provide either a group or an individual user administrative permissions over the partition that you are configuring.

When you are done, click Next and you will see a screen similar to the one shown in Figure B. This screen gives you the chance to import one or more LDIF files into the partition. This allows you to define the partition’s structure. The options that you choose here will vary depending on the needs of the application that will be using the partition.

Figure B You can use an LDIF file to define the structure of the partition.

Click Next and you will see a screen containing a summary of the configuration options that you have chosen. Take a moment to make sure that all of these options are correct, and then click Next to begin the installation process. When the installation process completes, click Finish.

AD LDS vs. ADAM

I want to wrap things up by talking for a moment about what makes AD LDS different from ADAM. There are several major differences, but one big difference is ease of management. You now have the option of using Active Directory Sites and Services to manage partition replication.

Another key difference is that it is now possible to audit changes to the directory service. Finally, AD LDS supports server core installations.

Conclusion

As you can see, installing AD LDS is not difficult to do. Even so, it is an essential skill if you plan on deploying an Exchange 2007 edge transport server or another directory enabled type of application server on Windows Server 2008.

Source: Petri.co.il

Configuring the Lightweight Directory Services, Part 1

The Light Weight Directory Services, or AD LDS, has been around in one form or another for quite a few years now. In Windows Server 2003, this service was called the Active Directory Application partition, or ADAM. Being that the service’s new name is the Lightweight Directory Service, I hate to describe the service as a lightweight version of the Active Directory, but that’s really what it is.

The basic idea behind this service is that sometimes you may need to provide an application with Active Directory data or with a way of storing application data in the Active Directory database. In many cases though, providing the application with access to a domain controller may be impossible because of connectivity issues. More often though, security concerns may prevent you from making a domain controller available to the application in question.

A Real World Example

OK, I realize that my description of the AD LDS is a bit abstract, but I want to try to clear things up by explaining one example of how AD LDS is commonly used in the real world. Microsoft makes use of AD LDS in Exchange Server 2007. In case you are not familiar with Exchange 2007, it is Microsoft’s E-mail server product.

Exchange Server 2007 is designed to be run in a distributed manner, and you can configure each individual Exchange Server to perform specific roles. One of these roles is called the Edge Transport Server role. The edge transport server sits at the network perimeter and acts as an entry point for inbound messages coming from the Internet. This server then performs a variety of message hygiene tasks to get rid of spam and viruses. Once the undesirable messages have been disposed of, any remaining messages are sent to something called the hub transport server, which then sends the messages to the mailbox server. I have drawn a diagram of the basic architecture that I am describing, for the benefit of those who may not be familiar with Exchange 2007. You can see this diagram in Figure A.

Figure A This is the basic Exchange Server 2007 architecture.

As you can imagine, the edge transport server needs to be well hardened against attacks. Not only does it routinely have to deal with viruses, it sits at the edge of the network, which means that the server is exposed to the Internet, and is therefore susceptible to attack.

Exchange and AD LDS

Now that I have talked about the basic Exchange 2007 architecture, I want to explain how an edge transport server uses AD LDS. Being that an edge transport server sits at the network perimeter, it needs to be far more secure than the other Exchange Servers in an organization. In an effort to make an edge transport server more secure, Microsoft forbids you from making an edge transport server a domain member. This is a really big deal though, because every version of Exchange Server since Exchange 2000 has been dependant on the Active Directory, and Exchange 2007 is no exception.

Microsoft gets around this issue by using AD LDS to act as a sort of mini Active Directory to the edge transport server. If the edge transport server happens to be installed on Windows Server 2003, then ADAM is used instead of AD LDS. The reason why Microsoft uses this technique is so that the edge transport server will have access to the Active Directory information that it needs, but will not contain any Active Directory information that it does not absolutely require.

I don’t want to get into all of the technical details about the ways in which Exchange Server uses AD LDS. What I will tell you though, is that the edge transport server needs access to some Active Directory information. For example, it needs to know which E-mail addresses are valid for the Exchange organization. E-mail addresses are stored in the Active Directory as attributes of user accounts. At the same time though, there are a lot of other user account attributes that the edge transport server does not need access to. Likewise, the edge transport server does not need to know about other Active Directory objects such as groups, group policy objects, and things like that.

As such, the edge transport server uses a technique called an edge synchronization to communicate with a domain controller. This allows the edge transport server to get the information that it needs, without getting anything extra. This information is then placed into a watered down Active Directory database (the AD LDS database), that no other servers use.

Conclusion

In this article, I have explained one real world example of how AD LDS is used. Of course AD LDS is not unique to Exchange Server. There are plenty of other uses for AD LDS. In Part 2 of this series, I will walk you through a sample AD LDS deployment.

Source: Petri.co.il

Jul 28, 2009

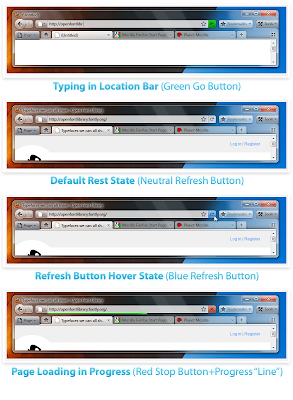
Một số hình ảnh về Firefox 4.0 thiết kế cho Windows 7

Firefox là trình duyệt miễn phí đang dần chiếm thị phần của trình duyệt Web. Mozzila đang phát triển thiết kế giao diện Firefox 4.0 để phù hợp với Windows 7. Một số hình ảnh:

McAfee Internet Security 2009 Full Version with 90 days Trial

Giải pháp bảo mật cho máy tính của bạn khi sử dụng Internet.McAfee Internet Security 2009 bao gồm 4 lĩnh vực bảo vệ chính: computer và file, internet và network, email và instant messenger, và parental control. Các đặc tính bao gồm: anti-virus, anti-spyware, anti-spam, anti-phishing, Firewall 2 chiều, đánh giá độ an toàn của website, identity protection, kiểm soát trẻ em, backup dữ liệu. Với các đặc tính mạnh mẽ này, McAfee Internet Security mang lại cho người dùng công cụ chống lại spyware, hackers,..khi lướt net. McAfee Internet Security có giá là 69,99$ khi mua ở Website của hãng, nhưng bạn cũng có thể đăng ký dùng thử 30 ngày. Người sử dụng máy tính xách tay Lenovo với tài khoản đăng ký với Lenovo, người dùng ở Malaysia và Philipin có thể đăng ký dùng thử tận 6 tháng. Tuy nhiên trong thời gian này, McAfee UK có khuyến mại: bất kỳ ai khi truy cập vào promotion page của McAfee UK đều có điều kiện dùng thử McAfee Internet Security trong vòng 3 tháng.

Jul 27, 2009

Mô hình Lab nâng cao RIPv2 và EIGRP

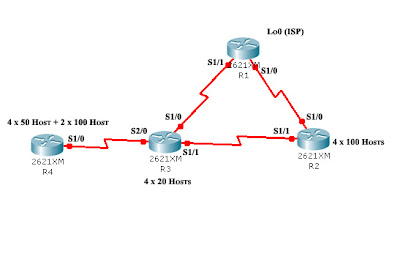
Mô hình lab:Mô hình gồm 4 Router được đặt tên như trên hình.
Dải địa chỉ IP được cấp: 172.16.0.0/16
Số host trên mỗi Router được chia như trên hình vẽ.
Yêu cầu:
Cấu hình Router cơ bản: Hostname, domain-lookup, password, banner,...
Cấu hình IP trên các Interface.
Cấu hình RIPv2 hoặc EIGRP: no auto, network, redistribute, passive-interface...
Manual summary IP address trên các Interface: ip summary-address.
Cấu hình Authentication: ip authentication
File cấu hình bằng Dynamips:

#####################################################################
# Lab Topology mappings for dynamips/dynagen
# Lab RIPv2, EIGRP advanced configuration.
# By THAOLV
#
#####################################################################

autostart = false

[localhost]
workingdir = C:\Program Files\Dynamips\sample_labs\CNAP_BSCI\EIGRP

[[7200]]
image = \Program Files\Dynamips\images\c7200-a3jk9s-mz.122-23.bin
idlepc = 0x6070c44c
npe = npe-400
ram = 160

[[ROUTER R1]]
console = 2001
S1/0 = R2 S1/0
S1/1 = R3 S1/0

[[ROUTER R2]]
console = 2002
S1/1 = R3 S1/1

[[ROUTER R3]]
console = 2003
S2/0 = R4 S1/0

[[ROUTER R4]]
console = 2004

Download đầy đủ: Topology, Bảng chia IP + Yêu cầu, File .net

Dynamips EIGRP Lab Topology

Here is some EIGRP lab topologies that I found on the internet. The labs using dynamips

Lab 2-1 EIGRP Configuration, Bandwidth, and Adjacencies


#####################################################################
# Cisco Networking Academy Program CCNP

# BSCI 642-901 Version 5.0 Lab Topology mappings for dynamips/dynagen
# Lab 2-1 EIGRP Configuration, Bandwidth, and Adjacencies
# By CiscoJourney
#
#####################################################################

autostart = false

[localhost]
workingdir = C:\Program Files\Dynamips\sample_labs\CNAP_BSCI\LAB_2.1_EIGRP\working

[[7200]]
image = \Program Files\Dynamips\images\c7200-adventerprisek9-mz.124-4.T1.image
idlepc = 0x6070c44c
npe = npe-400
ram = 160

[[ROUTER R1]]
console = 2001
f0/0 = SW1 1
S1/0 = R2 S1/0

[[ROUTER R2]]
console = 2002
f0/0 = SW1 3

[[ROUTER R3]]
console = 2003
f0/0 = SW1 5

[[ETHSW SW1]]
1 = access 1
3 = access 1
5 = access 1

Lab 2-2 EIGRP Load Balancing


#####################################################################
# Cisco Networking Academy Program CCNP
# BSCI 642-901 Version 5.0 Lab Topology mappings for dynamips/dynagen
# Lab 2-2 EIGRP Load Balancing
# By CiscoJourney
#
#####################################################################

autostart = false

[localhost]
workingdir = C:\Program Files\Dynamips\sample_labs\CNAP_BSCI\LAB_2.2_EIGRP\working
[[7200]]
image = \Program Files\Dynamips\images\c7200-adventerprisek9-mz.124-4.T1.image
idlepc = 0x6070c44c
npe = npe-400
ram = 160

[[ROUTER R1]]
console = 2001
S1/0 = R2 S1/0
S1/1 = R3 S1/0

[[ROUTER R2]]
console = 2002
S1/1 = R3 S1/1

[[ROUTER R3]]
console = 2003

Lab 2-3 Summarization and Default Network Advertisement


#####################################################################
# Cisco Networking Academy Program CCNP
# BSCI 642-901 Version 5.0 Lab Topology mappings for dynamips/dynagen
# Lab 2-3 Summarization and Default Network Advertisement
# By CiscoJourney
#
#####################################################################

autostart = false

[localhost]
workingdir = C:\Program Files\Dynamips\sample_labs\CNAP_BSCI\LAB_2.3_EIGRP\working

[[7200]]
image = \Program Files\Dynamips\images\c7200-adventerprisek9-mz.124-4.T1.image
idlepc = 0x6070c44c
npe = npe-400
ram = 160

[[ROUTER R1]]
console = 2001
S1/0 = R2 S1/0

[[ROUTER R2]]
console = 2002
S1/1 = R3 S1/1

[[ROUTER R3]]
console = 2003


Lab 2-4 EIGRP Authentication and Timers


#####################################################################
# Cisco Networking Academy Program CCNP
# BSCI 642-901 Version 5.0 Lab Topology mappings for dynamips/dynagen
# Lab 2-5 EIGRP Authentication and Timers
# By CiscoJourney
#
#####################################################################

autostart = false

[localhost]
workingdir = C:\Program Files\Dynamips\sample_labs\CNAP_BSCI\LAB_2.5_EIGRP\working

[[7200]]
image = \Program Files\Dynamips\images\c7200-adventerprisek9-mz.124-4.T1.image
idlepc = 0x6070c44c
npe = npe-400
ram = 160

[[ROUTER R1]]
console = 2001
f0/0 = SW1 1
S1/0 = R2 S1/0
S1/1 = R3 S1/0

[[ROUTER R2]]
console = 2002
f0/0 = SW1 3
S1/1 = R3 S1/1

[[ROUTER R3]]
console = 2003
f0/0 = SW1 5

[[ETHSW SW1]]
1 = access 1
3 = access 1
5 = access 1

Windows 7 Transformation Pack for Vista and XP

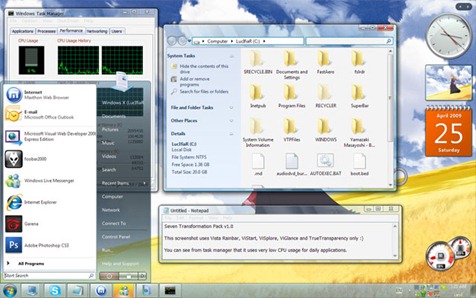
Windows 7 sẽ được public rộng rãi vào 22/10, nhiều người thực sự hứng thú với phiên bản này. Một số muốn khám phá các chức năng mới, một sô chỉ muốn sở hữu 1 giao diện tuyệt vời từ Windows 7. Transform Pack là chương trình giả lập Windows 7 trên các máy Vista và XP. Thực sự mà nói giao diện Windows 7 khá lạ mắt, gây nhiều hứng thú nhất đối với người dùng. Là một người sở hữu chiếc máy tính cấu hình thấp dưới 512MB việc cài Windows 7 là không thể vì Windows 7 yêu cầu tối thiểu 512MB để có thể cài đặt được. Cũng có một số cách hack để có thể cài Windows 7 trên các máy có dung lượng RAM dưới 512MB nhưng về tốc độ load thì XP sẽ ăn đứt. Việc sử dụng Transform Pack để sở hữu giao diện Windows 7 là sự lựa chọn tối ưu trong trường hợp này. Windows 7 Transform Pack sẽ thay đổi toàn bộ giao diện người dùng: Boot screen, Welcome screen, Visual Style, Icon, Wallpaper...
Một số hình ảnh sau khi cài Windows 7 Transform Pack:
Đây là Video quá tuyệt:

Download Seven Transformation Pack 2.0

10,000 người muốn kết bạn với Bill Gate trên Facebook

Bill Gate đã dừng sử dụng dịch vụ mạng xã hội Facebook vì có quá nhiều người muốn làm bạn với ông. Thực tế có tới 10,000 người muốn kết bạn với Bill Gate trên facebook, điều này gây nhiều phiền toái với ông. Trên facebook ông kể về những sở thích, con đường học tập của mình . Ông đã chấp nhận 112 người bạn trước khi có tới 10,000 người muốn kết bạn với ông. Một số hình ảnh của Bill Gate trên Facebook:

Windows 7 Ultimate E RTM (x86 and x64) Official Microsoft DVD ISO Images Leaked Download

Windows 7 với ký tự E đằng sau là chỉ tới phiên bản Windows 7 dành riêng cho các nước châu âu. Vì châu âu kiện Microsoft, nói Microsoft độc quyền IE trên HĐH của họ khiến người dùng không có lựa chọn khác. Để tránh thiệt hại kiện tụng Microsoft quyết định gỡ bỏ IE trên phiên bản hệ điều hành Windows 7 mới này khi xuất xưởng sang châu âu. Tôi nghĩ điều này thực sự bất tiện cho người dùng, nếu không có IE thì người dùng không thể lướt net để Download trình duyệt khác được Firefox chẳng hạn. Nhưng mình chẳng lo vì mình có ở châu âu đâu :). Nếu bạn nào có hứng thú với bộ sản phẩm đặc biệt cho châu âu này (có ký tự E sau tên sản phẩm) thì có thể Download cả 2 phiên bản x86 và x64 ở link bên dưới:
Download Windows 7 Ultimate E RTM 32-bit (x86) Retail English DVD ISO Image

File Name: 7600.16385.090713-1255_x86fre_cliente_en-us_Retail_UltimateE-GRMCEULFRER_EN_DVD.iso
Build:7600.16385.090713-1255
Size:2,500,075,520 byte
SHA1:BC10F09B86DCBAF35B31B0E6FBA7D006ACAAD28D
MD5:923C055E481BD02553B65840B928BF54
CRC:953EFBCC

BT Torrent: MICROSOFT.WINDOWS.7.ULTIMATE.E.RTM.X86.RETAIL.ENGLISH.DVD-WZT.torrent

Download Windows 7 Ultimate E RTM 64-bit (x64) Retail English DVD ISO Image

File Name: 7600.16385.090713-1255_x64fre_cliente_en-us_Retail_UltimateE-GRMCEULXFRER_EN_DVD.iso
Build:7600.16385.090713-1255
Size:3,223,410,688 byte
SHA1:029DCCEDD7691206010F84CE58343405A4DA92C9
MD5:F176B1CAAEBF45BDAD95B3D7885CCBDC
CRC:77BE890E

BT Torrent: MICROSOFT.WINDOWS.7.ULTIMATE.E.RTM.X64.RETAIL.ENGLISH.DVD-WZT.torrent

Bạn cũng có thể Download Windows 7 RTM ở bài Post trước mà cũng có thể được dùng để cài phiên bản "Châu âu" này.

Jul 26, 2009

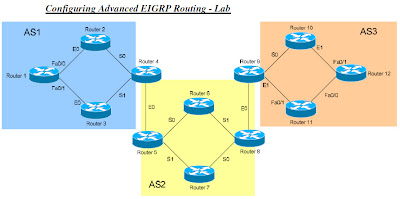
Advanced EIGRP Lab

Đúng là pó tay với cái Packet Tracer, cấu hình một thôi một hồi tự nhiên nó tắt ngóm, không hiện 1 cái massage, bao công cấu hình đi tong, ức chế...

Mô hình Lab
Bảng cấu hình IP trên từng Interface:

R1

Fa0/0

192.168.12.1

255.255.255.0

Fa0/1

192.168.13.1

255.255.255.0

R2

S0/0

192.168.24.1

255.255.255.0

Fa0/0

192.168.12.2

255.255.255.0

R3

S0/1

192.168.34.1

255.255.255.0

Fa0/0

192.168.13.2

255.255.255.0

R4

S0/0

192.168.24.2

255.255.255.0

S0/1

192.168.34.2

255.255.255.0

Fa0/0

192.168.45.1

255.255.255.0

R5

S0/0

192.168.56.1

255.255.255.0

S0/1

192.168.57.1

255.255.255.0

Fa0/0

192.168.45.2

255.255.255.0

R6

S0/0

192.168.56.2

255.255.255.0

S0/1

192.168.68.1

255.255.255.0

R7

S0/0

192.168.78.1

255.255.255.0

S0/1

192.168.56.2

255.255.255.0

R8

S0/0

192.168.78.2

255.255.255.0

S0/1

192.168.68.2

255.255.255.0

Fa0/0

192.168.89.1

255.255.255.0

R9

S0/0

192.168.109.1

255.255.255.0

Fa0/0

192.168.89.2

255.255.255.0

Fa0/1

192.168.119.1

255.255.255.0

R10

S0/0

192.168.109.2

255.255.255.0

Fa0/1

192.168.120.1

255.255.255.0

R11

Fa0/0

192.168.121.1

255.255.255.0

Fa0/1

192.168.119.2

255.255.255.0

R12

Fa0/0

192.168.121.2

255.255.255.0

Fa0/1

192.168.120.2

255.255.255.0


Yêu cầu:

Cấu hình IP trên các Interface trên từng Router như bảng trên.
Mỗi Router sẽ có 1 interface loopback giả lập mạng LAN với địa chỉ có dạng Y.Y.Y.0/24. Ví dụ Router 1 sẽ có LAN: 1.1.1.0/24
Cấu hình passwords routers: secret, line console, line VTY, password-encryption.
Cấu hình EIGRP trên mỗi Router: enable EIGRP, Network, Passive-interface, no auto-summary, Redistribute eigrp, Authentication.
Verify and Troubleshooting.

Download tài liệu chi tiết: Advanced EIGRP Lab
Mô hình Packet Tracer chưa cấu hình: Mô hình trắng.

 
Powered by Blogger.